Integrating Tailwind CSS with Eleventy (11ty) is straightforward and allows you to leverage Tailwind’s utility-first styling in your static site. Below is a step-by-step guide with code examples to set up Tailwind CSS in an 11ty project.
Table of contents
A Quick Overview off 11ty
11ty (pronounced “Eleventy”) is a simple, fast, and flexible static site generator that helps you build modern websites with minimal fuss. With 11ty, you can write your content using a variety of formats like HTML, Markdown, and Nunjucks, and it seamlessly compiles them into static pages.
Its simplicity lies in its configuration-free setup, allowing developers to focus on writing content and designing layouts. 11ty works well with many templating languages and includes features like incremental builds, content collections, and automatic template rendering, making it a powerful tool for building fast, maintainable, and scalable static websites.
Whether you’re building blogs, portfolios, or even documentation sites, 11ty offers a lightweight and extensible solution to create static websites with speed and efficiency.
What is Tailwind CSS?
It is a well-known fact that Tailwind CSS is a utility-first CSS framework. It lets you style elements directly within your HTML, thanks to pre-defined classes. Unlike other CSS frameworks that offer pre-built components, Tailwind offers these low-level utility classes that let you create your own design system. Thus, this makes crafting unique responsive designs effortless as there is not much to do with custom CSS.
Why You Should Choose TailwindCSS with 11ty for Your Projects
The pairing of 11ty and Tailwind CSS provides an efficient and streamlined approach to building powerful, feature-rich websites. Here’s why:
- Rapid Development: TailwindCSS’s utility-first approach allows you to style your website quickly without writing custom CSS for each element, while 11ty compiles static sites fast, ensuring a smooth development process.
- Performance-Optimized: Static sites generated by 11ty are inherently fast, and when styled with TailwindCSS, you get a lightweight, high-performance website that loads in no time.
- Easy Customization: TailwindCSS provides a flexible and customizable framework that lets you design exactly how you want, while 11ty’s templating system gives you complete control over your site’s structure.
How to Initialise an 11ty Project?
Prerequisites
- Node.js and npm are installed.
- Basic knowledge of 11ty and Tailwind CSS.
Set up a New Node Project: Initialize your project with npm, and add the necessary development and build scripts.
npm init -y
    npm pkg set scripts.dev="eleventy --serve"
    npm pkg set scripts.build="eleventy"
Install 11ty : Use npm to install 11ty for static site generation.
npm install @11ty/eleventyCreate a layout template: Define your layout by creating a file at rc/_includes/layouts/default.njk
---
title: My Blog
---

<!doctype html>
<html lang="en">
  <head>
    <meta charset="utf-8">
    <meta name="viewport" content="width=device-width, initial-scale=1.0">
    <title>{{ title }}</title>
    <link rel="stylesheet" href="/styles/index.css">
  </head>
  <body>
    {{ content | safe }}
  </body>
</html>
Create a homepage: Set up a homepage by creating a file at src/index.njk
---
layout: layouts/default.njk
---

<!-- Content Here -->
Step-by-Step Guide to Setting Up TailwindCSS v4 with 11ty
Install Tailwind CSS and Dependencies : Install PostCSS and Tailwind CSS using npm.
npm install postcss tailwindcss@latest @tailwindcss/postcss@latestUpdate or Create the CSS File: If you don’t have an existing CSS file, create one at src/styles/index.css and configure it to include TailwindCSS.
@import 'tailwindcss';Create eleventy.config.mjs : Create the eleventy.config.mjs file in the root directory to configure TailwindCSS output
import fs from 'fs';
    import path from 'path';
    import postcss from 'postcss';
    import tailwindcss from '@tailwindcss/postcss';

    export default function (eleventyConfig) {
      eleventyConfig.on('eleventy.before', async () => {
        const tailwindInputPath = path.resolve('./src/styles/index.css');
        const tailwindOutputPath = './dist/styles/index.css';
        const cssContent = fs.readFileSync(tailwindInputPath, 'utf8');
        const outputDir = path.dirname(tailwindOutputPath);

        if (!fs.existsSync(outputDir)) {
          fs.mkdirSync(outputDir, { recursive: true });
        }

        const result = await postcss([tailwindcss()]).process(cssContent, {
          from: tailwindInputPath,
          to: tailwindOutputPath,
        });

        fs.writeFileSync(tailwindOutputPath, result.css);
      });

      return {
        dir: { input: 'src', output: 'dist' },
      };
    }
Run the project: Use the command to compile Tailwind CSS and launch the project.
npm run devCreating a Profile Card Using TailwindCSS Utilities
Create a ProfileCard.njk File* : Create a new file called ProfileCard.njk inside the src directory
 ---
    layout: layouts/default.njk
    permalink: /profile/
    ---

    <div class="flex flex-col items-center justify-center max-w-md p-6 bg-white rounded-lg shadow-md gap-4 text-center">
      <img src="<https://cdn.flyonui.com/fy-assets/avatar/avatar-1.png>" alt="user" width="50" height="50" class="rounded-full"/>
      <div class="flex flex-col items-center">
        <h2 class="text-xl font-semibold">John Doe</h2>
        <p class="text-gray-500">Software Engineer</p>
      </div>
      <p class="text-gray-500">
        Lorem, ipsum dolor sit amet consectetur adipisicing elit. Harum animi beatae molestiae quasi fugiat ut.
      </p>
      <button class="bg-purple-400 text-white px-6 py-3 rounded-full hover:bg-purple-500 transition duration-300 active:scale-95">
        View Profile
      </button>
    </div>
Run the Command and Preview: Execute the command and view your profile card by navigating to localhost:8080/profile.
npm run dev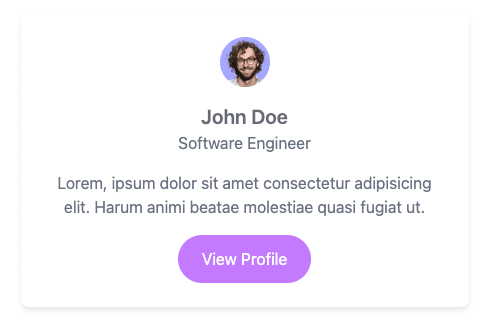
Creating a Profile Card with TailwindCSS and FlyonUI
Here, we’ll use FlyonUI, an open-source Tailwind CSS Components Library. It offers a wide range of customizable, accessible, and ready-to-use components.
Also available in the pro version. It includes
Now, let’s integrate 11ty with FlyonUI components and create a profile Card.
npm install flyonui@latestAdd FlyonUI plugin: Include the FlyonUI plugin by adding it to your style.css file.
@import 'tailwindcss';
    @plugin "flyonui";.
    @import "flyonui/variants.css";
    @source "./node_modules/flyonui/flyonui.js"; // Add only if node_modules is gitignored
Update eleventy.config.mjs to Copy FlyonUI JS:** Modify the eleventy.config.mjs file to ensure the FlyonUI JavaScript is copied during build.
export default function (eleventyConfig) {
      // Copy flyonUI JS
      eleventyConfig.addPassthroughCopy({
        "node_modules/flyonui/flyonui.js": "vendor/flyonui/flyonui.js",
      });
  ...
    }
Include FlyonUI JavaScript in the Layout: Integrate the FlyonUI JavaScript into the src/_includes/layouts/default.njk file for JavaScript components.
 ---
    title: My Blog
    ---

    <!doctype html>
    <html lang="en">
      <head>
        ...
        <link rel="stylesheet" href="/styles/index.css">
      </head>
      <body>
        {{ content | safe }}

    	// FlyonUI Javascipt
      <script src="/vendor/flyonui/flyonui.js"></script>
      </body>
    </html>
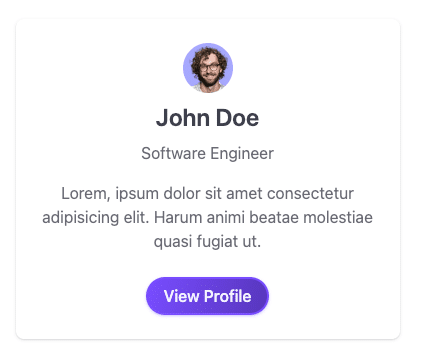
Refactor the Profile Card with FlyonUI Components: Enhance your profile card by incorporating FlyonUI’s ready-made components like Avatar, Card, Buttons, and more.
<div class="card">
      <div class="card-body items-center text-center">
        <img src="<https://cdn.flyonui.com/fy-assets/avatar/avatar-1.png>" alt="user" width="50" height="50" class="rounded-full" />
        <h5 class="card-title">John Doe</h5>
        <h5 class="card-subtitle mb-2">Software Engineer</h5>
        <p class="mb-4">
          Lorem, ipsum dolor sit amet consectetur adipisicing elit. Harum animi beatae molestiae quasi fugiat ut.
        </p>
        <div class="card-actions">
          <button class="btn btn-primary btn-gradient rounded-full">View Profile</button>
        </div>
      </div>
    </div>
This is how your Profile Card will appear:
Conclusion
Combining 11ty with Tailwind CSS delivers a fast, efficient, and flexible way to build high-performance websites. This powerful duo streamlines development, enhances design consistency, and ensures a responsive, modern user experience. Perfect for any project, 11ty and Tailwind make web development faster and more enjoyable.
Here’s the repository where you can find more details or see the complete code: 11ty-tailwindcss-setup. I hope this tutorial helps you with the 11ty integration with Tailwind CSS.
For awesome Tailwind resources, check out the All UtilityCSS. It is a one stop collective that includes numerous Tailwind resources like components, tools, templates, blocks, etc.
Happy Coding 🙌🏻